Digital Photography

So last weekend Pete and I went out to Buena Vista to climb Mount Hope and pick up Taco. I’ve already written all about our 50% success rate in last weekend’s endeavors, so I won’t bore any of you again with the extended details. Instead I thought I’d spend a few minutes outlining one of the new techniques I’m really getting into with digital photography.
For starters, let’s just say that digital photography is just plain different than traditional photography. While the differences are many, for my money, the biggest single difference is sensor size. I’ve been excited about photography for a long time, and for me that means a lot of different cameras. Along my journey there have been countless 35 mm point-and-shoot cameras, an old 110-format camera, and even a funky disc camera; remember those? Later in high school I got a lot more serious about photography and purchased a nice Minolta SLR. I was also shooting occasionally with my grandfather’s old 6×9 medium format Graflex Speed Graphic press camera. The more portable 35mm was an all manual system with a few nice lenses before some French thief swiped it in Paris. Oh well, c’est la vie!

Since insurance massively depreciated the camera it was quite a while before I could afford to purchase a replacement. When I did, I switched to another Japanese brand. Now I’ve been shooting Nikon for several years. Since I mostly enjoy shooting landscapes, I don’t bother carrying a light meter. The TTL spot meter does just fine, and I’ve learned through years of practice the value of bracketing. I don’t tend to carry a tripod as often as I should (although one of those ultra-light carbon fiber units would sure make a swell Father’s Day present). Luckily I prefer to work with a fairly open aperture and relatively fast lenses for the reduced depth of field and selective focus control. This allows me to typically get away with hand holding the camera and still pull off some pretty good sized enlargements.
The point of all of this rambling is to drive home the importance of sensor (or film) size when it comes to enlargements. With an excellent 35 mm negative, you can pretty easily make enlargements all the way up to 20″ x 30″. Given the size of the original image (slide, negative, etc.) is 24 mm x 36 mm, that’s about a 21.2 x enlargement. If the same image had been recorded with my 6 cm x 9 cm view camera, a 20″ x 30″ print would have only been a 8.4 x enlargement, and a 21.2 x enlargement from the resulting image would produce a whopping 51″ x 77″ print (rounded to the nearest inch). Going the other direction, with a sensor measuring only 15.8 mm x 23.6 mm the same 20″ x 30″ print requires a massive 32.2 x enlargement. The same 21.2 x enlargement would result in only a 13″ x 20″ print (again rounded to the nearest inch). It’s still a good sized print, but I’ve got prints of both size hanging in my living room, and the 13″ x 20″ seems way smaller than the 20″ x 30″ print. The point, to get the same enlargement from a smaller image requires much higher resolution which is even more demanding on your equipment. This is a case where size really does matter.

Luckily the computer age has has really matured as of late. It’s now possible to carry around a relatively portable digital SLR with a single lens and get some of the benefits of a medium or large format view camera. You may even be able to achieve all of this without the bulk of a tripod. I wish I could take credit for some of these ideas, but alas, they aren’t mine. Nevertheless, I think they work well enough to share with you all. Having shot with medium format sheet film in a lovely, yet old, view camera, I won’t pretend to tell you that a larger image size is the only benefit. I also won’t pretend that portability is the only down side to the medium format camera. For starters, shooting without a tripod is just about impossible with a view camera. Even with a rangefinder attached, it becomes increasingly difficult to hand-hold the beast.

The basic approach here is to expand the image size captured with the digital SLR. In theory this approach can be used with traditional film cameras, but the darkroom work would have required unbelievable levels of skill. In the modern digital darkroom it would be a lot more practical, but still much more time consuming. What we are going to do is stitch together multiple images to make one larger image. In principle, if we stitch together enough images, and they align well enough, we can get something comparable (at least in size) to the much larger images recorded by traditional view cameras. Much of this concept came from landscape photographer Jack Dynkinga. In brief, he is using some fantastically expensive perspective-correcting lenses to expand the sensor size of his full-frame Nikon digital SLR. Check out this article about his techniques for more background.
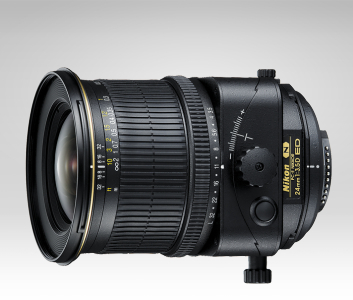
Even without perspective-correcting lenses and a full-frame digital SLR, we budget-constrained photographers can reap some similar benefits. For those unfamiliar with perspective-correcting lenses, these little marvels have a built in hinge within the lens and a small knob to control the tilt of the front element. They often crop up in architectural photography when the artist wants to avoid perspective effects that cause parallel lines to converge towards the horizon. This effect is averted by positioning the film (or sensor) parallel to the vertical or horizontal lines and tilting the lens to capture the image. If instead, you lock the camera in place (tripod) and use the tilt feature to grab more of the image in both directions (up and down or left and right) you get several images that you can stitch together perfectly. In essence, the final stitched composite image is similar in size to one shot with a view camera and a much larger sensor.

Now, this isn’t a new technique. Point-and-shoot cameras have come with panorama stitching software for years. Our old Canon offered this very feature, and we’d tried it out on several occasions, but the results were always pretty sub-par. While I too cannot afford PC lenses, I can get pretty good results with this technique. The first major change from taking “panoramas” is to turn the camera sideways. Rather than stitch the images together length wise, we’re going to stitch along the longer edge. The resulting images will be much closer to the traditional 3:2 aspect ratio of 35 mm photography. The other main trick is to set everything manually.
What I like to do is survey the scene from one extent to the other with the aperture I intend to use. This is important as the aperture setting will dictate depth of field (what’s in focus) throughout the resulting image. I then look for the brightest and darkest spot within the scene and set a shutter speed that keeps the brightest spots from blowing out and losing highlight detail while also avoiding the complete loss of shadow detail in the darkest regions. This can require a bit of compromise. Of course, I can correct the exposure for all of these images after returning to the digital darkroom, but it’ll be far more time consuming, with no guarantee of getting a good composite image.
Once the aperture and shutter speed have been selected, the only thing that remains is to focus and shoot. I list focus as a specific step, because this too is a spot where allowing the camera to take over might reduce the quality of the finished product. If you’re shooting with a tripod and your camera allows manual focus, you can set the focus for exactly the point you desire. As an alternative, I’ve achieved good results using Nikon’s focus point control and centering a point for each image on either the same feature or another feature at a similar distance. This is much easier if working without a tripod, but increases the odds that two regions in adjacent images will be differently focused. If this occurs, the stitching algorithms won’t work as well. Also, unless you’re really worried about the exposure, resist chimping and taking looks at all of the images as you capture them.
As mentioned before, and featured prevalently in Jack Dynkinga’s article, perfect alignment will be assured if the optical center of the lens doesn’t shift during the picture taking process. This is only really possible with a tripod and perspective-correcting lenses. Of course, you could also get this effect with a view camera with a lens bellows, but you wouldn’t really need to if you had such a setup. Instead, concentrate on moving the camera through just a single plane with as little shift about the lenses center as possible. If you’re mounted on a tripod, you can pre-align the pan to maintain the camera alignment. You can also purchase, or make, some mounts that will help to position the camera’s nodal point right above the tripod’s axis of rotation. This will simulate the effects of a fixed sensor and PC lenses so well that the alignment might still be very nearly perfect.
So far, all of this sounds pretty easy, but the daunting task of stitching all of these images together still remains. If your alignment is perfect, just drop the images into Photoshop or the Gimp and git ‘er done. If, like me, you have less than perfect alignment, a dedicated stitching program might be a better way to go. There are myriad programs available, but being a big fan of open source software (and unwilling to pay hundreds for Adobe products) I’ve really glommed onto Hugin. You can get the software from SourceForge. To make the best use of the software, you’ll also need to download one of the automatic control point generators. I painstakingly located about 5-10 points per stitch for the first composite I produced with Hugin and the results were pretty good; however, the automatic control point generators will locate about 1000 points for each overlap and downselect from those to obtain the optimal fit. A number of good tutorials exist to discuss the multitude of options like projection, so I won’t cover them here. Just check on the SourceForge page and follow the appropriate links.
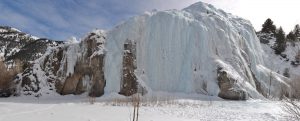
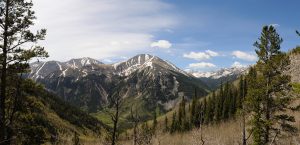
If you don’t follow my advice regarding the manual exposure settings and instead let the camera select the exposure for each image, you can still stitch them together, but you may not like the results nearly as much. This image is a good example of how Hugin attempts to deal with widely varying exposure values at the individual image boundaries. As an alternative, you may adjust each image individually to a standard, but again this will result in a slow and time-consuming process. Using all of the details outlined above, I was able to perform the RAW conversion and stitch 4 different composites I recorded during a recent climb of Mount Hope in just an hour at the coffee shop. It would have taken much longer if I’d also had to adjust exposure and white balance for each of the individual images. I did add a little sharpening through the Gimp’s unsharp mask and increased the color saturation of the final composite slightly. These were performed on the TIFF output from Hugin based on the 8-bit high-quality jpegs I used as the input. I’m sure the color saturation and sharpening would have been a wee bit better if I was working with the 12-bit RAW files.

While Hugin doesn’t support any of the popular RAW formats directly, it can work with HDR-type images through 16-bit TIFFs and a few other formats. If you anticipate significant modification after the stitching has been done, you might want to convert all of your RAW images to TIFF prior to the stitching. To date, I’ve performed all of my stitching on high-quality jpegs, but I’ll be re-stitching a recent composite with 16-bit TIFFs, and I’ll post the results once I’ve finished so that you can see what impact you might expect. One thing is a certainty; it’ll take the software much longer at every step in the process than with compressed jpegs.
2 Comments
Pingback:
Pingback: