Kokopelli’s Trail: Day Zero
When we announced that we were moving to Colorado, several of my coworkers back in Boston recommended new vacation spots that they were sure we’d enjoy. Moab was one of the most frequently mentioned; I often rode my mountain bike to work. It wasn’t until we’d actually arrived that I’d even heard of Fruita. I guess I’d had my head buried in the proverbial sand throughout college.
Not long after the move, we started looking into some of the new places we could go and things we could do. Unlike Boston, parking was a non-issue in Boulder, so we were keen to get out on the weekends. One of our first events was the 6th annual Ouray Ice Festival. While we’d been poor excuses for rock climbers for some time, we were just beginning our careers as mediocre ice climbers, and the idea of being in a small town where practically everyone climbs ice was fascinating. That was the fall of 2001, and we’ve been to every festival since.

One of the great things about Colorado is the extreme changes in weather. While most of our friends and relatives assume that winter is a 10-month season of hellish cold and unrelenting snow, reality is pretty different. You can often find days in the winter warm enough for a nice day of climbing at Eldo or riding the mountain bike around Lyons. Jess has only had to remove the battery from her motorcycle once because extended poor weather made riding unlikely. By the time April rolls around, the Western Slope is already growing hot and hitting its prime for mountain biking. That’s when we first learned of Fruita.
When we were living in Boston, we took a weekend camping trip to Wampatuck State Park. They had a nice system of trails open to mountain biking, so we brought our bikes. That was Jess’s first exposure to mountain biking, and she was hooked. So, when the weather turned nice in Boulder, I started looking for some of this legendary Colorado mountain biking I’d heard of. One of the first things we found was the Fruita Fat Tire Festival. The weather forecast looked exceptional (80 degrees and sunny in April), and rumors circulated that the trails were incredible. We ended up camping pretty far from the trails, but had a great time anyway. We got to ride some awesome trails, and despite running out of water and fitness, were grinning ear-to-ear the whole time. We also watched a couple of really fun trials riders doing a series of demos in the park in downtown Fruita. I’m still blown away by what some people can do on a bike.
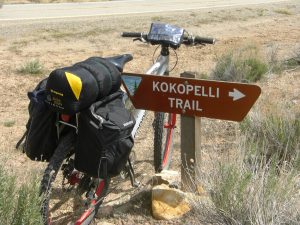
The first trail we rode in Fruita was called Mary’s Loop. It’s a neat combination of rocky climbs, 4-wheel drive road, and some fun singletrack. It taught us that you need more than a couple of water bottles to ride in the desert. It’s also the beginning of this cool trail called Kokopelli’s Trail that runs from Fruita to Moab. From that day onward, I determined I should ride Kokopelli’s Trail, and that the entire trail would be sick mountain biking.
Fast-forward several years. It’s 2009; I’m flipping through a new issue of Dirt Rag, and I’ve just learned that Kokopelli’s Trail turns 20 this year. Now, the desert is no place to be in the summer, and in the desert the summer is pretty much May–September, so that leaves two smallish windows of opportunity in the spring and fall. I know Jess pretty well, and I know she doesn’t have the vacation or desire for this ride, so I e-mailed an adventure-writing buddy of mine, Pete, to see if he’d be interested. He was, and more importantly, he’d landed an article assignment based on the ride. It was on like Donkey Kong; just the planning remained.
In planning a trip on Kokopelli’s Trail, as with riding the trail, there are 3 major concerns. One is the length of the trip. At 142 miles, most people will require several days and therefore some vacation to finish the ride. This brings us directly to the second major issue: water! Of all of the essentials, water is really the biggest logistic challenge. If it’s hot, and it probably will be, you’ll want at least a gallon or two per person, per day while on the trail. This dovetails nicely with challenge three: planning the trip. You’d be surprised to discover that there’s a dearth of quality information available for planning to ride Kokopelli’s Trail. It’s mentioned in a few guidebooks, but mostly they focus on either end of the trail in Fruita or Moab. There’s very little detail about the middle of the trail.
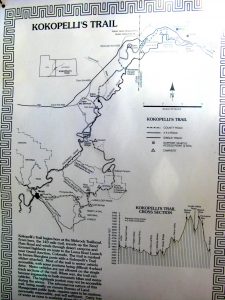
The best resource I could find was a 1-page, 2-sided map produced by the Colorado Plateau Mountain Bike Association (COPMOBA). Even that was rather confusing, because it listed a number of smallish campsites not included on any other maps. Eventually I had to call the BLM offices in Grand Junction and Moab to find out if the sites were real. The field rangers I spoke to were quite helpful. The ranger in Moab gave me pretty good directions to the Rock Castle campground high above the Castle Valley outside Moab, and she warned me against filtering Colorado River water due to excessive silt. I should have listened to this advice specifically! The Grand Junction office informed me that it was legal to park overnight at the Loma trailhead, and that they’d not experienced issues with vandalism or break-in. Both rangers impressed upon me that there is “no water on the trail!”

Okay, if you’re familiar with the trail, you might also know that there are several travel companies that offer guided tours of Kokopelli’s Trail. If you can afford to travel this way, it’s a great idea, but at around $1000.00 a person, it’s way too steep for my blood. The upside to the guided tour is the ability to have all of your camping gear shuttled from campsite to campsite by a support van. This also includes a prodigious amount of water, food, and best yet, beer. It sounds spectacular, just you and about 8 of your newest friends sitting around a campfire at night after riding all day, sipping a fine microbrew.
So, maybe that doesn’t really appeal to you any more than it appeals to me. I want to carry my stuff, and more importantly, I want to ride with my friends, not a laundry-list of guide-service clients. The biggest problem was going to be water. After looking at the COPMOBA map, which included rough trail descriptions and mileage, I cooked up a plan that seemed like it could work. We’d spend 4 days and 3 nights on the trail. We’d drop some water at the Bitter Creek campsite prior to setting off on the trail, and filter some Colorado River water at Dewey Bridge (not quite there anymore) for day 3. Jess would meet us above Castle Valley on the 3rd night with more water, and join us for the Porcupine Rim descent into Moab. It would be a mostly unsupported trip on Kokopelli’s Trail, and it would be nearly impossible for us to complete as planned. (I wouldn’t be aware of the last point until I was halfway to Moab.)
With the itinerary planned, the only thing that remained was the question of how to carry all of my stuff. I did an overnight trip to Winter Park a while back via the Rollin’s Pass/Corona Pass road, and for that trip I used a rack that attaches to the seatpost of a mountain bike. It worked pretty well, but the clamp wasn’t designed for a seatpost of the size that fits into my Cannondale hardtail. It’s too big and doesn’t attach firmly. That allowed it to swing around during hard cornering, not something I wanted to deal with for 4 days. Luckily, a coworker was able to machine a small plastic spacer for me. It worked well in the shop, making a tight fit that didn’t want to slip under moderate force.
On the Winter Park ride, I used a small bag that clipped to the top of the rack. It was large enough to hold a change of clothes and some extra food and water, but it wasn’t going to be sufficient for camping gear. On the Winter Park trip we stayed in a lovely hostel in Frazier, so I didn’t need much in terms of gear. A trip to the local REI produced a pair of “inexpensive” panniers that explicitly stated they were for road use only; however, after trying every single bag they stocked, it was clear that these attached the mostly firmly to my little rack. Since I was certain that most of the damage would occur from the bags flopping around, I decided that these would probably hold up better than the others that fit more sloppily. They were also the cheapest set of bags available, and because they were a little smaller in terms of volume, they’d help me keep my load under the 20-pound weight limit of the rack.
I was up crazy late the night before the trip, packing and repacking the paniers. I kept trying to reduce the weight without compromising my total calories. I even looked up how many calories you get from peanuts (a lot) in order to determine how many to bring (too many). Finally, I was satisfied, but the bags still seemed likely to outweigh my rack’s rating. I was pleasantly surprised to find that they were 9 and 10 pounds respectively when I put them on the scale at work the next day. With everything packed, it was hard getting through the day of work knowing that I’d be on Kokopelli’s Trail tomorrow morning! It was an odd mixture of nervousness and excitment.