Wheel Building

Kokopelli’s Trail was hard on my bike. It’s already rough on a race hardtail to have a 200+ pounder riding around on its back, but add on the extra 20-30 pounds of gear, and the burden grows that much greater. A broken chain was the only obvious sign of damage, but the poor shifting performance after replacing the chain hinted that at least the cassette was badly worn.
Since I like to do most of my own bike maintenance, I picked up a new SRAM cassette. I’d been riding for a few months with a badly bent large chainring, so I decided to replace the middle and large chainrings as well. The “new” chain only had a few miles of wear, so I hoped it hadn’t been too damaged by riding with the old cassette.
As often happens with major overhauls like these, I ran into a few snags. The first was just extracting the crank arms from the bike. Theoretically you can remove the middle and large chainrings without removing the cranks, but the bottom bracket felt a little sticky, so I wanted to check out the bearings as well. I’ve never been a big fan of self-extracting crank bolts, but most of the new external-type bottom brackets only work this way. I was eventually able to get the cranks off, but the crank bolt was trashed, so I also had to order a replacement from Race Face.
When I removed the old cassette, I discovered that I had several worn spokes on the rear wheel. Since none of the spokes were broken and I didn’t have any replacement spokes on hand, I decided to just true the wheel and hope for the best. That worked for about 1 week of mountain biking. On the 2nd day of our trip to Fruita, I was experiencing what I thought was wind-up. This can happen when the ratchet pawls in the freehub body break down and stop ratcheting. I’m familiar with the problem because I replaced a freehub body on one of Jess’ wheels a few years ago.
About a mile farther along the trail, I noticed a funny noise coming from the bike. Just after starting up Steve’s Loop, I pulled over to look at the bike. At first I couldn’t find anything wrong, but eventually I found a broken spoke. Yep, the time I saved earlier was coming back to bite me in the rear. I attempted the traditional trailside repair by wrapping the nipple-side of the broken spoke around an adjacent spoke to keep it out of trouble, but I couldn’t find the other half of the spoke. Eventually I located the empty flange hole, so the broken end must have fallen out.
When I got back home, I pulled off the brake rotor and the cassette and examined the spokes. I pulled off another drive-side spoke and one from the opposite side for sizing the replacements. I counted at least 10 damaged spokes from one side of the wheel and about 5 from the other side. Most of the damage was from rocks scratching across the spokes. Given the large number of worn spokes, I decided to re-spoke the entire wheel. That meant I needed to track down 32 new spokes. Since I wanted to keep the same look, I needed to get black double-butted spokes. This wouldn’t normally be a big problem in Boulder, but it was after 6:00 on a Saturday, so most of my favorite bike shops would be closed.
This is where Performance Bike comes in. Performance is a weird bike store by Boulder standards. They are one of the only bike chain stores selling bikes in the area. They have a pretty good supply of tools and parts, and most of the tools are out where you can pick them up without having to speak with the shop. As always, there are pros and cons to such an arrangement. When it comes to the shop, they’ve never impressed me with their expertise. For a while they were one of the only Cannondale dealers in town, so I did need to make use of their services from time to time. The guy working in their shop was helpful, but they had an incomplete supply of spokes. They also don’t sell by the box, so the cost per spoke is a bit high.

I ended up getting double-butted spokes for the non drive side and straight gauge spokes for the drive side. I was able to down-size the non drive-side spokes by a millimeter, but the size wasn’t available for the drive side, so I just lived with the original size. (Typically you can reduce the length of spokes by 1-2 mm when reusing a rim and hubs.) I also picked up some new brass nipples. Rather than counting out the nipples, the tech just put a handful into a baggy.
Since we were planning to ride on Sunday after church, I needed to finish the wheel rebuild Saturday night. Normally this wouldn’t be a big deal, but Jess and I went to watch the new Star Trek movie. It was a lot of fun, but we didn’t get home until about midnight! It was about 12:30 a.m. when I had all of the parts assembled and got underway. I put on the television for some company and sat down to rebuild the wheel.
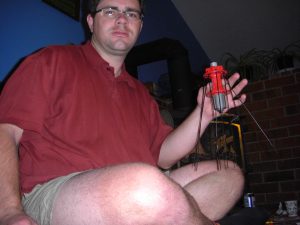
The first step is just taking apart all of the pieces from the old wheel. I took a few pictures before starting just in case I needed a reference for reassembly. Several of the old nipples were badly nearly stripped from all of the truing over the past several years. One of the problems with alloy nipples is the relative ease with which they can be stripped. It took about an hour, but eventually I had a pile of spokes and nipples sitting next to my old rim and hub. Oddly, I’ve had a replacement rim sitting around for a while, so I planned to use the new rim with the new spokes/nipples and the old hub. Although I’d originally suspected the freehub body might need replacement, when I took off the cassette, I could see a small scratch on the back side. As best I can tell, the broken piece of spoke must have been scratching and occasionally catching in the cassette as the wheel was spinning. I’m lucky the broken piece fell out and nothing major happened.

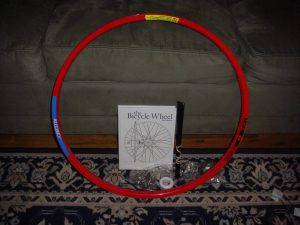
After the old wheel was disassembled, it was time to start rebuilding the “new” wheel. I turned to the bible, The Bicycle Wheel by Jobst Brandt. It’s a great book, even if it made me a bit curmudgeonly. Basically, if you’ve read Brandt’s book, you’re a proponent of 3 or 4 cross spoking with 28-36 spokes per wheel. My wheels started out with a 32 spoke, 3-cross pattern, which is just what I wanted to rebuild. Conveniently, there are pretty much step-by-step directions in the bible. Assembling the wheel is surprisingly simple. It’s a bit tedious, but as long as you’re meticulous it isn’t really hard.
Several years ago, a good friend built a new set of wheels for his road bike. He was initially working without the bible, so I got a nice play-by-play of all of the possible missteps. One of the biggest errors is ignoring the location of the valve stem. In a well designed wheel, the valve stem will be positioned between two of the nearly parallel spokes. This provides good access to the valve stem without compromising wheel strength. Matt’s 1st build didn’t achieve this ideal, so he had to disassemble and start over. I was lucky to know about this pitfall in advance and avoid this mistake.
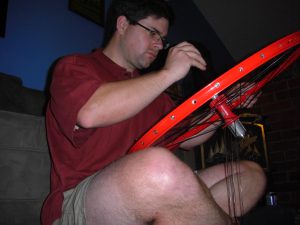
It’s a little tricky getting the 1st couple of courses of spokes into the wheel, as everything just flops all over the place; but as it begins to look more like a wheel, things get easier to handle. Once fully assembled, the next task is to tension and then true the wheel.
There are a few specialized bike maintenance tools that I don’t have in my tackle box. Most of these are expensive frame building and finishing tools. As much as I’d love to own them, they really don’t make sense for the home mechanic. For instance, you can have your bottom bracket faced and a new crank (or bearing) installed by a quality repair shop 10 times before you would cover the cost of a refacing tool. That’s a big investment! A spoke tensiometer is another example. There are only a few commercial tensiometers available, and they are all expensive. Since I’ve got a pretty good ear, I instead used the less precise tone method of determining spoke tension. In this technique, you can estimate the tension based on the tone produced when plucking or lightly tapping the spokes. By comparing with a well built wheel, you can get the tension pretty close. You can also quickly spot significant differences in tension from spoke to spoke. In an ideal wheel, you’d have equal tension in all of the spokes on a single side. Because with a modern rear wheel, there is a difference between the angles made by the drive-side and non drive-side spokes, the tensions on the two sides will be different in order to place the rim exactly in the center of the hub. This happens because of all of the extra space needed for a multiple-gear cassette.
With the wheel assembled and tensioned, I grabbed my dishing tool to see how centered the rim was. Not even close! I wasn’t surprised as I was evenly tightening the nipples in 1 turn increments throughout the tensioning. A few passes around the rim adding tension to one side of the wheel and reducing the tension on the opposite side corrected the dish.

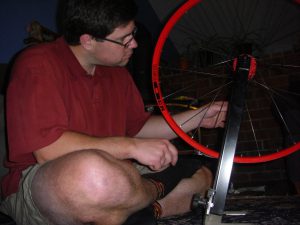
By this point in time, I was getting pretty bleary-eyed and the sky was growing visibly lighter. I popped the wheel onto the truing stand and gave it a spin. It was immediately obvious that I would have my work cut out for me. After a few adjustments, I gave the wheel another spin. One of the best things about truing your own wheels is the amazing feeling you get when you see the rapid improvement that can be made from just a few minor adjustments. When you’re starting from scratch, it takes a bit longer, but little by little, things improve. Truing wheels is a constant trade-off between getting the rim true (no wobble) and concentric about the hub (no hop). It’s easy to find that one of these two traits are perfect, but the other is way off. If you’re careful, you can get these qualities to come together simultaneously, and if you’re really good (or lucky) when you give the wheel a final check for dish, it’ll be right on.
For me, the latter didn’t quite happen, but it isn’t too hard to fix. Unfortunately, I was exhausted and wasn’t thinking straight. I made a pass going around the rim and providing the wrong correction. I made two passes before I caught my mistake. Another couple of passes with the right correction, and the dish was back. I put the wheel back into the truing stand, and of course, the true was off. I readjusted from true and hop and rechecked the centering. This time it all came together. I popped the wheel off the stand and reinstalled the brake rotor and cassette.
I’ll give you all an update once I’ve ridden the wheel a while and let you know how the rebuilt wheel holds up. If it stays true half as well as the original despite the abuse of a Clydesdale-class rider, I’ll be super pleased.
One Comment
Pingback: